Online Front of House and Back of House training for Nextera POS

Menu Layout for Online Ordering

Menu Layout for Online Ordering

Introduction:

This document explains the new menu layout implemented for the OLO.

Requirement:

A setting to configure the menu layout should be provided in the online order admin page.
Implementation in OLO:

Page Navigation: Online order store Admin page >> Account settings

– A new field “Menu layout” should be included in the store account settings.

– The “Menu layout” should have the following options,

1) Default Layout

2) Large image

3) Small image

4) No image

– The “Default layout” should be selected by default.

– Large images, small image and no image represent the new menu layout UI with large, small and no menu icons, respectively.

Screenshot for menu layout configuration:

Large Image Layout:

Small Image Layout:

The menu images should be displayed in small icons.

No image Layout:

Submitting Batch/Batch Report

1. Make sure all the close out procedures are complete before being able to submit batch. You will need to submit batch before being able to run a batch report.
Close the Day
2. From the main terminal screen, select ‘Operation’, then select ‘Batch/Tip Adjustment’ (located in left column) & now select ‘Submit Batch’, located in the bottom left area of the screen. Batch-Tip AdjustmentSubmit Batch


3. With these 2 different tasks completed, you are able to run batch report.
Batch Report

User Roles


Adding a User Role:

Select “User Management”, “Roles”, “+Role”

User Roles-1


Select the name and priority of the Role

User Roles-2


Giving Permissions:

Select “Back Office” to enable/disable permissions

User Roles-3


Select “POS” to enable/disable permissions

User Roles-4


Select “POS Operation” to enable/disable permissions

User Roles-5


Select “Report Access” to enable/disable permissions

User Roles-6


Select “Dashboard” to enable/disable permissions

User Roles-7

Credit Card Tips Report Guide

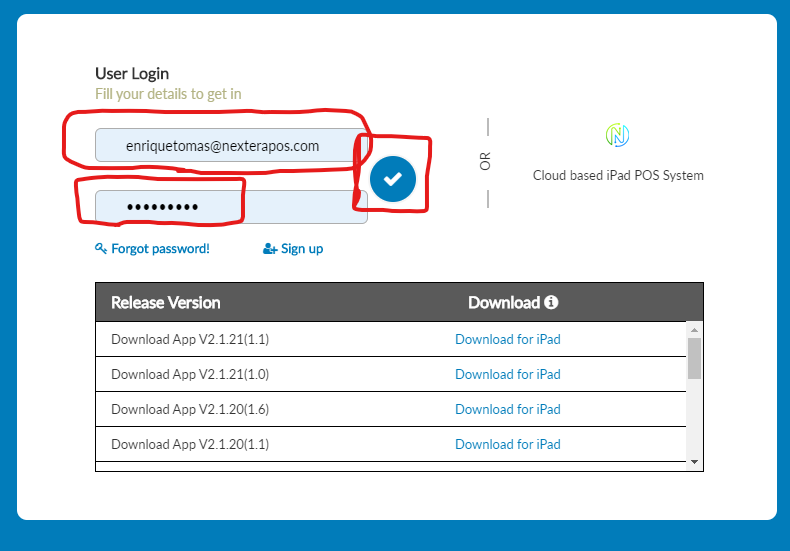
  1. Open internet browser & go to https://nexterapos.upos.io/#/login
  2. Enter &/or make sure credentials are correct then use mouse to left click on blue circle check mark.

CC Tips-1

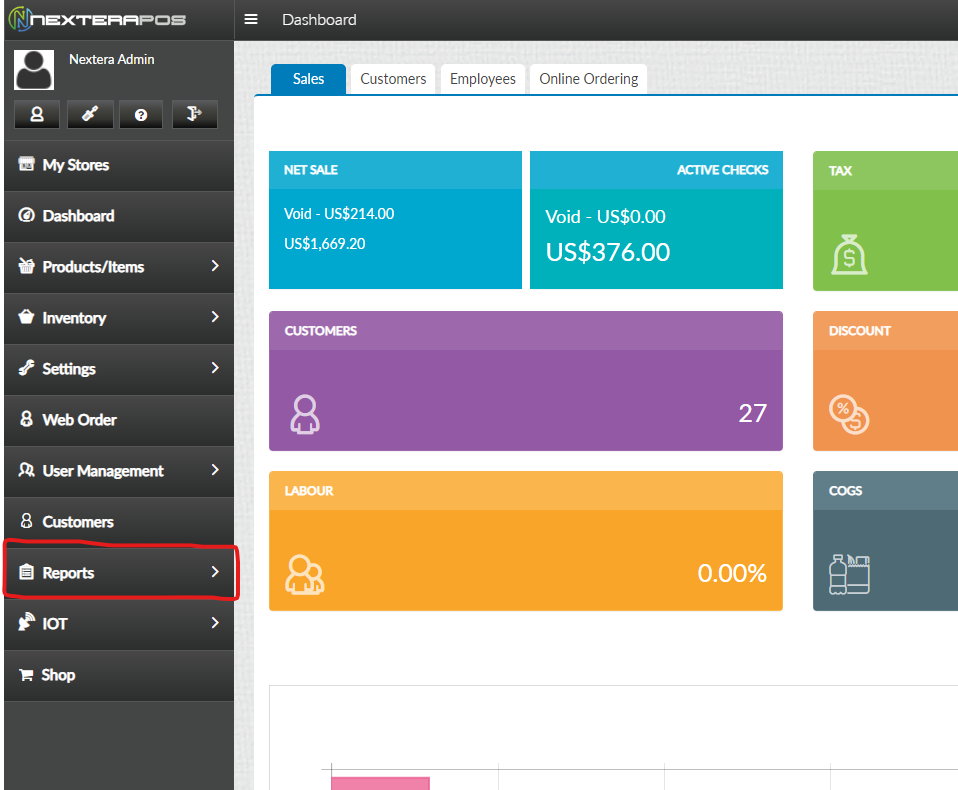
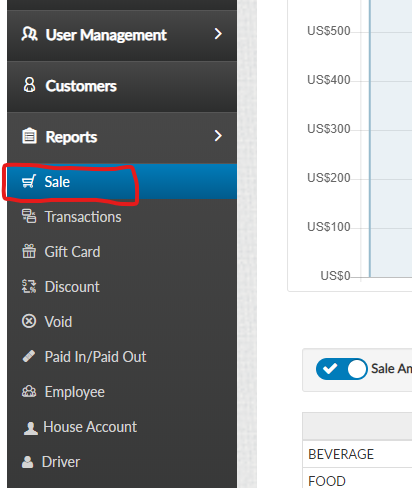
3. Click on Reports in the left column.

CC Tips-2

4. Select Sale in the drop down column after selecting Reports.

CC Tips-3

5. Click on the Cashier Out tab on the top blue row.

CC Tips-4

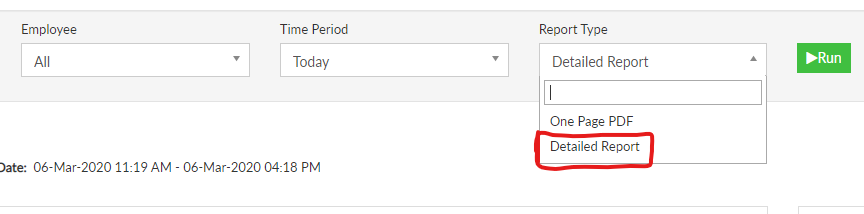
6. Under Report Type, select Detailed Report in the drop down option. Only select the One Page PDF if that is what you need. (One Page PDF might be suitable for if you were trying to print the report)

CC Tips-5

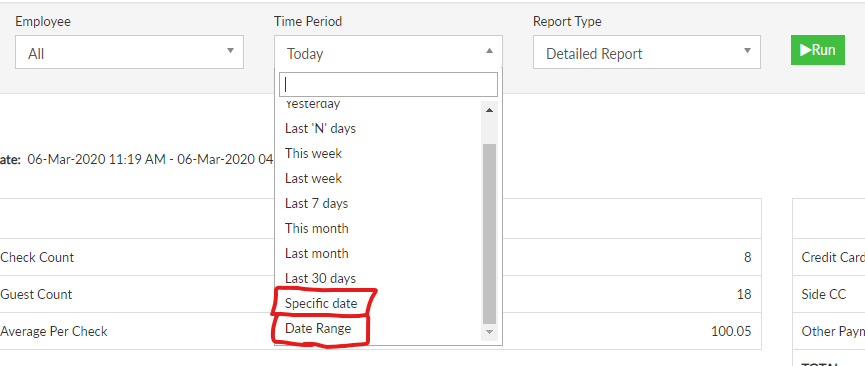
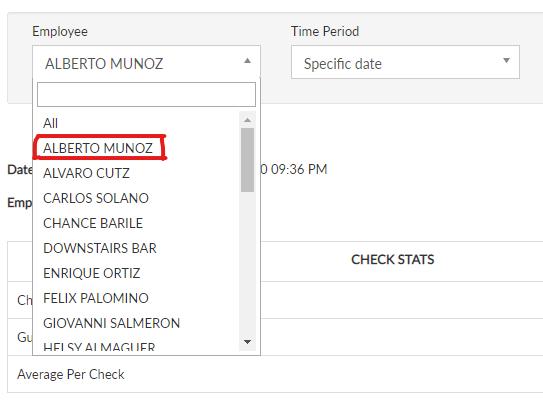
7. Select the desired time/day from the Time Period drop down menu. You can select multiple days by selecting Date Range or a specific day by selecting Specific Date. Select the desired day in the calendar option & then select the green close button.

CC Tips-6

CC Tips-7

8. If you want a sales & tip report for all employees, select the run option. This will give you the total sales & tip figures for all employees who worked during that day or the days selected.

CC Tips-8

CC Tips-9

9. Select employees from Employee drop down menu to review each individual sales & tip report. Then click the green Run button.

CC Tips-12

CC Tips-10


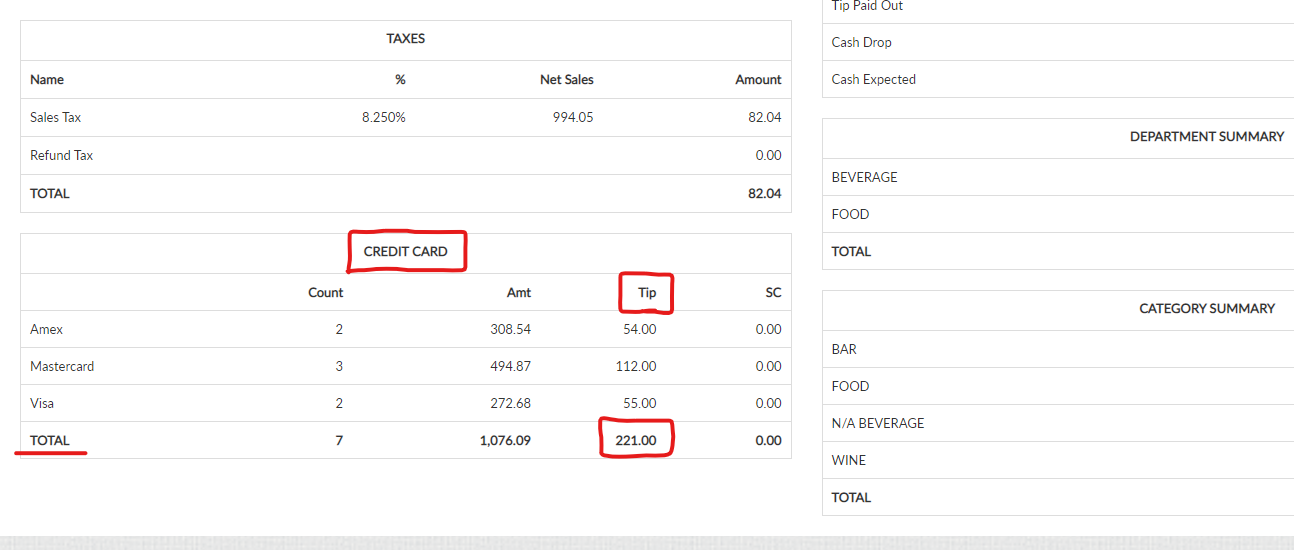
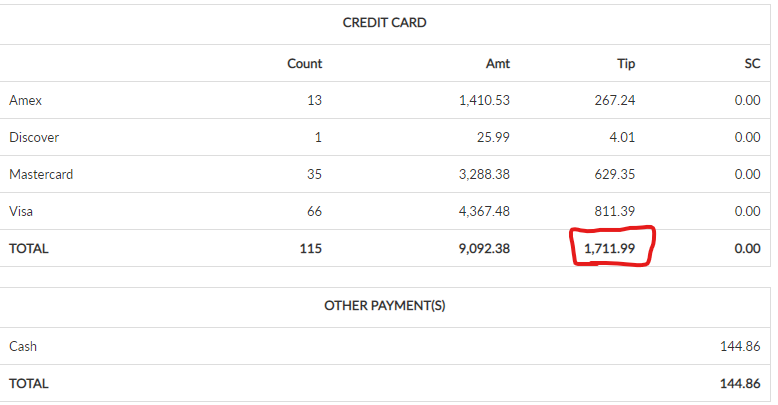
10. Scroll down and look at the Tip Total under the CREDIT CARD box. This is where you can review each individual Credit Card Tip total for each server &/or bartender who worked during that day or days. Repeat steps 9 & 10 to review however many employees total credit card tips that you wish to see.

CC Tips-11

Splitting Ticket-Split Check

  1. After selecting the ticket to split check. Select the grey/black split arrow button, located in the lower left area of the screen next to ‘Total’ & ‘Paid Amount’.
  2. Select ‘SPLIT CHECK’ DO NOT select ‘SPLIT BY SEAT’
  3. Select ‘Add’ in upper right area of screen to create however many ways you want to split the check. This example we will do 4. ‘Split by seat’ will also add a ‘Check’ column, but only once.
  4. If you need to separate items from the main check onto a different check for someone to pay separately, then you will select ‘Split by seat’, located in the lower left area of the screen. This will create a new column labeled ‘Check’, to where you will move the items you wish to have paid out separately.
  5. Select the item(s) you wish to move over. ‘SEPARATE ITEM’ should only be used if you wish to split an item into however many ways you wish. To do this, select the item you wish to split, then select ‘Separate Item’, then select the number of times you wish it to be split. This will auto split the item in the column with number of times it is split. You can move these items to wherever they need to go for the split check.

Split Item Check-1

6. Select ‘Save & Close’. This will return you to the ordering screen. If you messed up or you need to put these back together, go back to the table layout screen. Select ‘Merge’ in the lower left area of the screen. Then select the table you had the separate checks on & select all the separate checks. This will auto populate the area on the right under ‘Merge Checks’, then hit done. This will put all the separate checks back together.

Split Item Check-2


7. IF you did not mess up & need to close out the ticket(s), select the check that needs to close out & continue with the payment process.

Adding an Employee

Adding an Employee with Payroll:

Select “User Management”, “Users”, “+Add”

Add Employee-1

After filling out the employee information select the “Next” button

Add Employee-2

Select “+Payments”

Add Employee-3

Select how the employee will receive their wage

Add Employee-4

Select what date the wage is effective and hourly salary and select “Save”

Add Employee-5

Payment Added

Add Employee-6

Tax Exempt

Creating Tax Exempt reason in BOH:

Select “Products/Items” then “Reasons” and “+Tax Exempt Reason”

Tax Exempt-1

After typing in a reason select “Save”

Tax Exempt-2

Using Tax Exempt in the FOH:
Select “Option”
Tax Exempt-3
Select “Tax Exempt”
Tax Exempt-4
Select the Tax-Exempt reason
Tax Exempt-5
Notice: Tax has been removed
Tax Exempt-6

Forced Punch In/Out

How to Force Punch: Out

Select “User Management” Select “Force Punch In /Out”
Forced Punch In-out-1

Select the “Employee” name, Change the “Date” of the specific date you are looking for, select “Run”
Forced Punch In-out-2


Select the pencil icon

Forced Punch In-out-3


Edit the “Clock Out Time” to correct time the employee left, Select “Update” when finished

Forced Punch In-out-7


How to Punch Clock: In

Select the pencil icon

Forced Punch In-out-4


Adjust the “Clock In Time” on the time that the employee came to work, Select “Update”

Forced Punch In-out-6


As shown: Changed “Clock In” and “Clock Out” time

Forced Punch In-out-7

Types of Refunds

Types of Refunds

How to Refund Without Receipt:

Select “Operation”

Refund-1


Select “Refund”

Refund-2


Select the “date” and press “Search” then of the refund and select the check that needs to be refunded and select “Refund Without Receipt”

Refund-3


Select the amount you need to refund and select “Type of Refund” and type in a “Reason”

Refund-4


Select “Yes” to confirm the refund

Refund-5


Refund Success

Refund-6


How to Refund Menu Items:

Select the “date” and press “Search” then of the refund and select the check that needs to be refunded and select “Refund Menu Items”

Refund-7


Select the item you would like to refund and select “Refund Item”

Refund-8


Select “Type of Refund” and type in a “Reason”

Refund-9


Select “Yes” to confirm

Refund-10


Refund is Success

Refund-11


As Shown: Item has been refunded

Refund-12


How to Refund with Receipt:

Select the “date” and press “Search” then of the refund and select the check that needs to be refunded and select “Refund”

Refund-13


Refund the amount needed and type in a “Reason” and Select “Type of Refund”

Refund-14


Select “Yes” to confirm

Refund-15


Refund Success

Refund-16


Checking the “Refund” Report on the BOH:

Select “Reports” then Select “Refund”, select your “Time Period”, finally click “Run”

Refund-17

Cash Discount

To enable “Cash Discount”:

Go to “Settings”, “Store”, “Settings”

Cash Discount-1

Scroll down and enable “Cash Discount”

Cash Discount-2

Go to “Cash Discount” select how much you are discounting for using cash and select “Update”

Cash Discount-3

Cash Discount used in FOH:

Notice: “Cash Option is the new Total the customer will pay if they use Cash

Cash Discount-4